Create the Azure AS SSO Application
The following screenshots and process was correct and valid as of the last update to this documentation (21/11/2024). Microsoft does like to rename and move things around so if something is wrong please let us know via the support options.
This will be a SP (Service Provider) initiated flow, so users will still have to authenticate via the Focus website. idP initiated is not supported, but if your Organization requires this, please reach out for a work around.
Entra application setup
- Open the Azure portal and sign in as an administrator
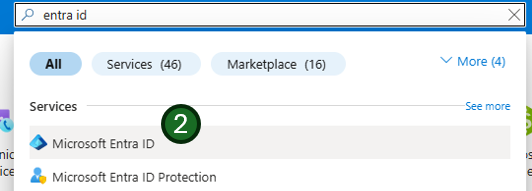
- Search or select
Microsoft Entra IDservice from the search on left hand menu
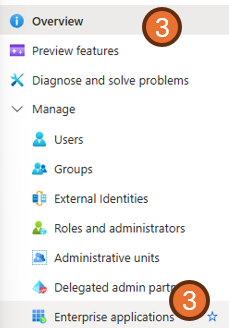
- Navigate to the
Enterprise applicationssection within theManagemenu.
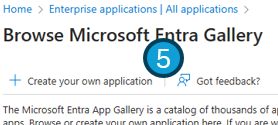
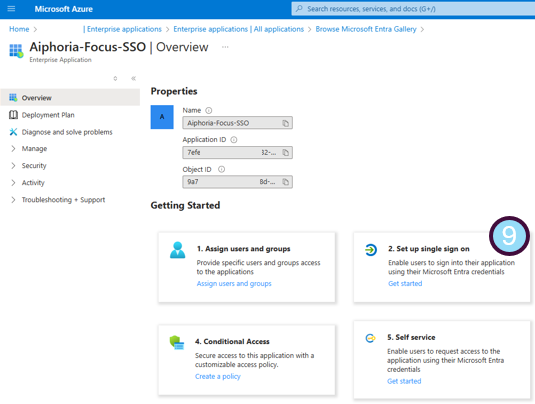
- Click
New application

- And select
Create your own application.
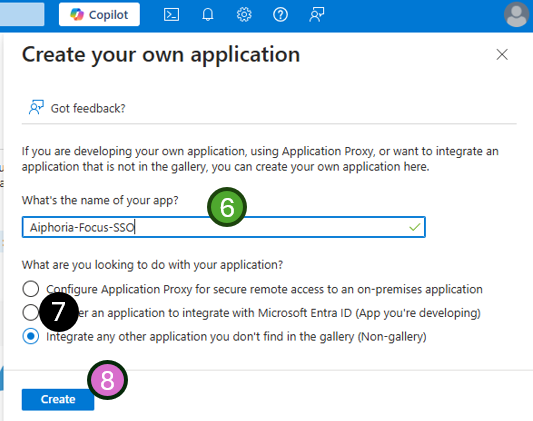
- Enter the application name. E.g.
Subphonic-Focus-SSO - select
Integrate any other application you don't find in the gallery (Non-gallery)from the application options - Press
Create
- Select Setup single sign-on
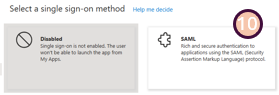
- From the next menu, Select
SAML
- On the next screen you will be asked for two bits of information:
- click the 'Edit' button and complete the required fields.
- The URLs needed in this section will be provided to you by the Subphonic support team upon request. Under each section you will need to press the
addbutton to complete both theIdentifier (Entity ID)andReply URL (Assertion Consumer Service URL)sections. - Press
Saveat the top of the section
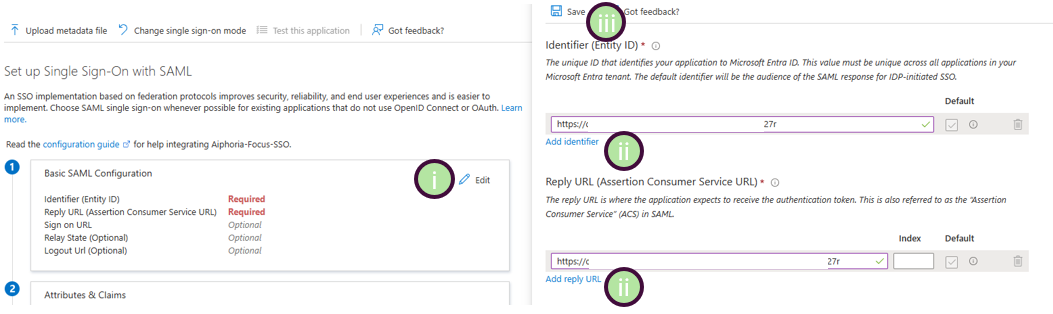
- Identifier: The Identifier or Entity ID represents a globally unique identifier for your Focus service, functioning as the EntityId for SP during authentication requests to the IdP. This identifier is pivotal for the secure exchange of SAML assertions and other authentication-related data between the IdP and Focus.
- Reply URL: The Assertion Consumer Service (ACS) URL is the location where the SAML assertion is sent with a POST request. This URL is used by the IdP to send the SAML assertion to Focus. It acts as a callback URL where Focus expects to receive and consume the SAML response containing the user's identity information.
Perfect, the application is now setup 👍
Data to be provided to Subphonic
Almost done, however to make the SAML SSO integration work, you will need to provide the IdP metadata back to the Focus support team. The required data is all within the same Enterprise Application -> Single sign-on settings page.
Focus provides three different ways to configure the IdP metadata. The easiest way is by providing the metadata URL of the Azure AD SSO application.
- Copy the App Federation Metadata Url from section 3 of your Azure AD SSO application's SAML Certificates section and send to the Focus support team
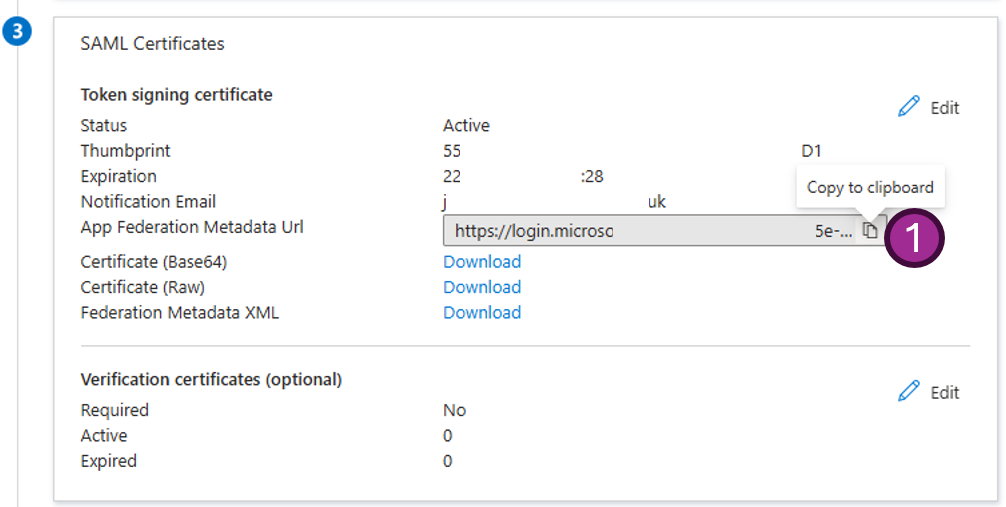
If you are not able to supply the Metadata URL (preferred method), Focus also supports an upload of the XML file (simply send this to the support team) or adding the data manually, if you need to go down this route, we will require the Sign on URL, Issuer url and the Certificate please contact support if you need more help.
- You will also need to provide the email domain used for auth e.g. @mycompany.com
Configure user attributes mapping
Focus provides a flexible way to map the user attributes returned from IdP to the user attributes in Focus. Focus will sync the following user attributes from IdP by default:
- id: The unique identifier of the user. Focus will read the nameID claim from the SAML response as the user SSO identity id
- email: The email address of the user. Focus will read the email claim from the SAML response as the user primary email. This is mapped to: emailaddress
- name: The name of the user. This is mapped to: user.displayname
If you wish to change or add any mappings please contact support
Configure user roles
When a user logs in via SSO, Focus reads their role from the standard Microsoft Entra ID role claim:
http://schemas.microsoft.com/ws/2008/06/identity/claims/role
- If a role claim is sent, the user's Focus role is set to match the claim value on every login.
- If no role claim is sent, new users are created as a Standard User and existing users keep their current Focus role.
To send a role claim, you need to define App Roles on the application in Azure and then pick the appropriate role for each user when you assign them in the next section.
Configuring roles is recommended for any SSO setup — it lets you manage Focus permissions directly from Azure rather than editing each user inside Focus.
Define App Roles
- In the Azure portal, navigate to your Enterprise Application (the one created for Focus SSO).
- Go to App registrations and find the corresponding app registration.
- Select App roles from the left menu.
- Create one app role for each Focus role you intend to use, using the exact values from the table below as the role's Value.
Allowed Role Values
| Role Claim Value | Description |
|---|---|
SuperUser | Full account admin |
AdminUser | User and account management |
ComplianceUser | Read-focused access, reporting and downloads |
Supervisor | Team oversight |
TeamLeader | User management plus standard user access |
GeneralUser | Standard user |
BasicUser | Same as GeneralUser |
PlaylistUser | Playlist access only |
Make sure the role value configured in Azure matches exactly as shown in the table above (e.g. SuperUser not superuser).
You only need to configure the roles you intend to use — not every role is required.
Assign users to the Azure AD SSO application
Only users assigned to your Azure AD SSO application will be able to authenticate through the Focus Azure AD SSO connector. To assign a user or groups of users to the application follow the steps below:
- From within the same Enterprise Application -> Single sign-on settings page, select
Users and groups - Then
Add user/groupat the top of the page

- Select the text
None Selectedand a search menu will open - Search for any users or groups you wish to authorize for access to the application
- Tick the required users or groups
- The users being added will show on the far right menu

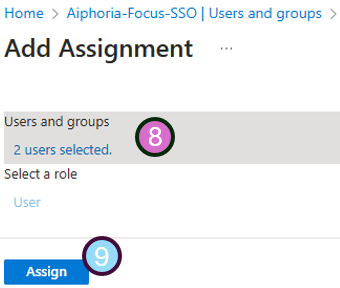
- Once you are happy with the selected users and groups, press
Selectat the bottom - If you defined App Roles in the previous section, select the appropriate Focus role for each user or group
- You will get a confirmation screen with how many users are being added
- If happy, press
Assign
🎉🎉 Congratulations, your authorized users should now be able to login to the Focus portal.🎉🎉
Optional: Pre-provision users with the Entra Sync app
By default, users are created in Focus the first time they log in via SSO (just-in-time provisioning). If you'd like users to appear in Focus before their first login — so you can assign them to groups, configure settings, or have them visible in the admin screens ahead of time — you can enable the Entra Sync app.
The Entra Sync app only pre-loads users — role assignment still happens via the SAML role claim configured above on every login.
For setup instructions, see the Pre-provisioning users with Entra Sync guide.
Troubleshooting Common Issues
If you encounter issues during the setup or login process, here are some common problems and their solutions:
- Users cannot log in: Verify that the users are assigned to the Azure AD SSO application. Check the "Users and groups" section to ensure the correct users or groups are added.
- Metadata URL not working: Ensure the Metadata URL is correctly copied and accessible. Test the URL in a browser to confirm it returns the expected XML.
- SAML response errors: Use browser developer tools to inspect the SAML response. Verify that the
IdentifierandReply URLmatch the values provided by Subphonic. - Attribute mapping issues: Confirm that the attributes returned by the IdP match the expected mappings (e.g.,
emailaddress,user.displayname). Contact support if custom mappings are needed. - Missing or incorrect permissions: If no role claim is configured, new users provisioned via SSO will be set up as a Standard User. To automate role assignment, see the Configure user roles section above.
Security Best Practices
- Always share the Metadata URL or XML file securely. Avoid using insecure channels like unencrypted email.
- Regularly review and update the list of authorized users and groups to ensure only necessary access is granted.
Testing the SSO Setup
Before rolling out the SSO setup to all users, test it with a small group of users to ensure everything works as expected. Use the following steps:
- Assign a test user to the Azure AD SSO application.
- Attempt to log in to the Focus portal using the test user's credentials.
- Verify that the user attributes (e.g., email, name) are correctly synced.
If any issues arise during testing, refer to the troubleshooting section or contact support for assistance.