Installation
Getting started
This installation process may look a bit daunting 👩🎓! But trust me, it's actually super simple 🔤, we just set it out in lots of steps to give you all the detail you may need.
If you do get stuck or have questions, please contact our Customer Operations team who would be happy to help guide you over what needs to happen.
Requirements
Before getting starred please make sure that you have the following ready to go:
- An Azure Administration account with access to App registrations.
- PowerShell on your laptop and the azure permissions to run teams commands.
Windows 11 has PowerShell preinstalled but if you need instructions they can be found at https://learn.microsoft.com/en-us/powershell/scripting/install/installing-powershell-on-windows?view=powershell-7.4 For MacOS instruction https://learn.microsoft.com/en-us/powershell/scripting/install/installing-powershell-on-macos?view=powershell-7.4
App registration
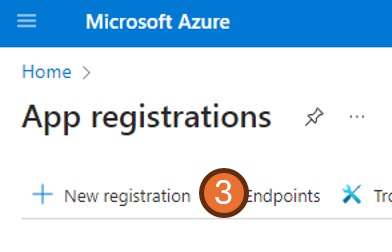
- Login to your Azure portal.
- Head or Search for "App registrations".

- Click New registration
-
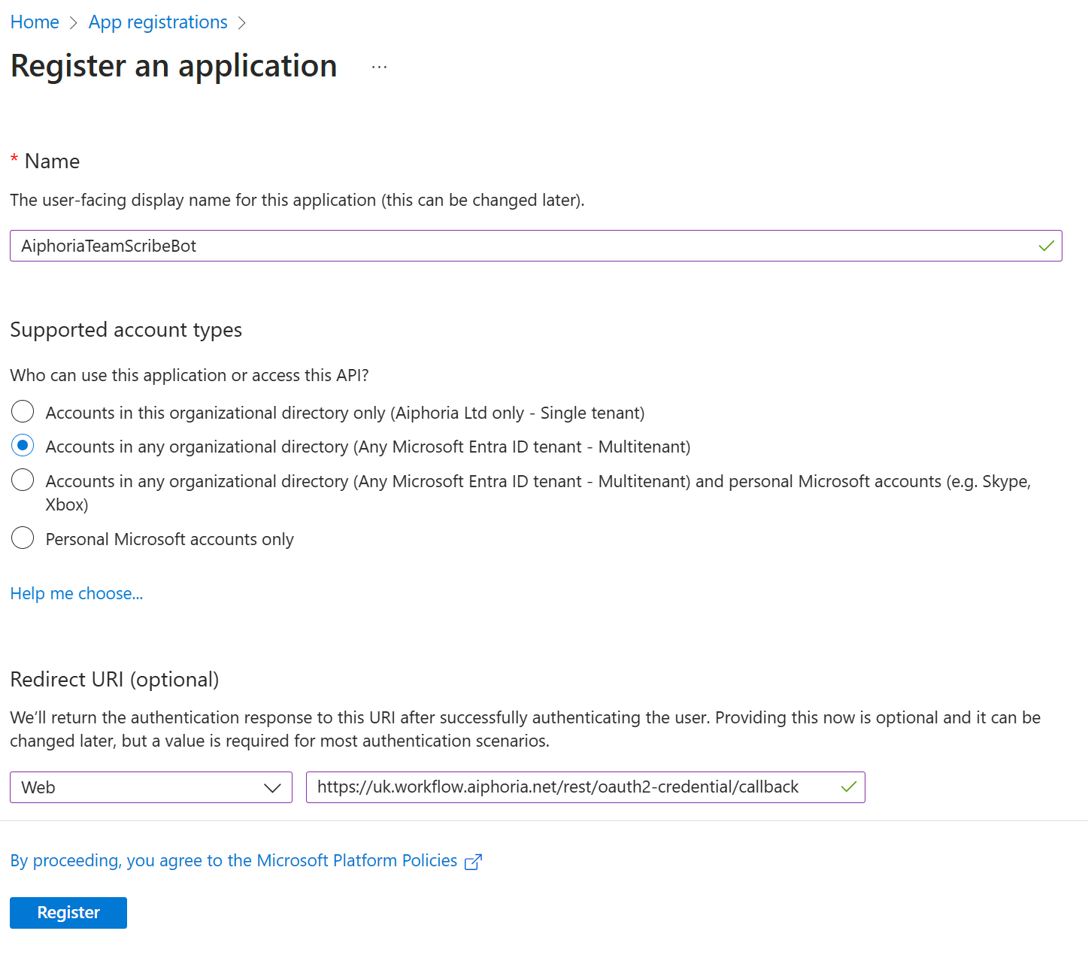
Complete the options as below:
- Name: Any name you wish, we recommend something like AiphoriaTeamScribeBot
- Account Type: Accounts in any organization directory
- RedirectURL:
- Press Register
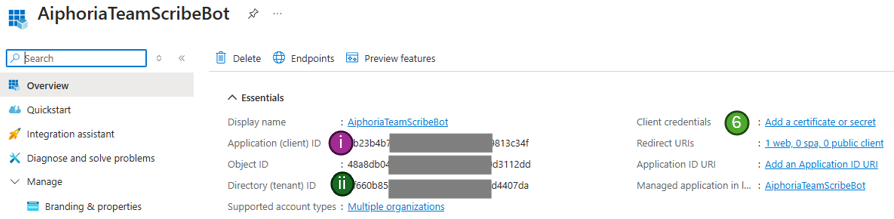
- Once created, copy the two new GUIDs (IDs) to a safe place for later use:
- Application (client) ID.
- Directory (tenant) ID .
Certificate creation
- Select Add a certificate or secret from the right hand side of the same page.
- Select New client secret.
- Complete the information as below:
- Name: Aiphoria-Scribe-Secret.
- Expires: 12 months (or longer if you wish).
- Press "Add".

On the next screen you will see the secret in the value as section shown. This is only visible when first created and cant be found later! Use the copy icon to make sure you copy the full value of the secret and add it to a safe place along with the other information needed earlier.
- Copy both values for use later.

API Permissions
- Select API Permissions from within the manage menu.
- Followed by Add a permission.
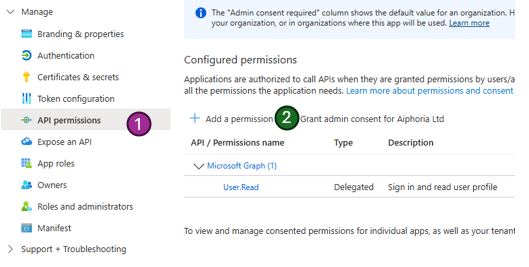
- Select Microsoft Graph from the list of common APIs.
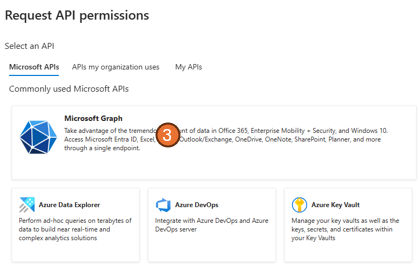
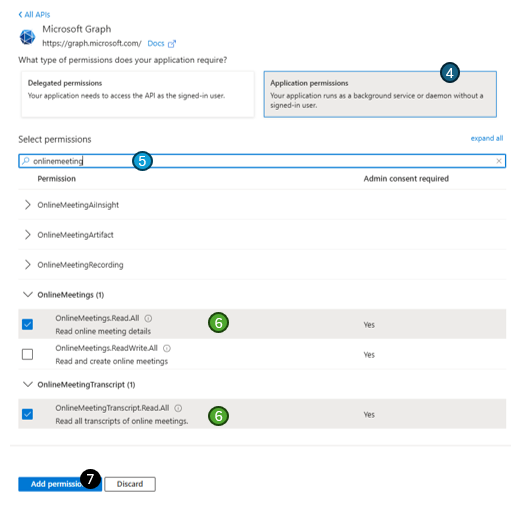
- Followed by Application permissions
- Search for onlinemeeting in the search box.
- Tick both the permissions OnlineMeetingTranscript.Read.All and OnlineMeeting.Read.All.
- Once both are ticked, press Add permissions at the bottom of the page.
- On the next screen you should now see the two new lines (along with any already set), the two new lines will show as Not grated for (your org).
- Press the Grant admin consent for (your org) button.
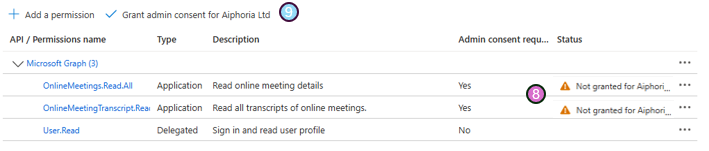
- You should now see a green tick next to all the permissions.

Linking the app to Teams via Powershell
- Open a PowerShell terminal window (You will need to run this as an Admin via CMD, Terminal or PowerShell directly).
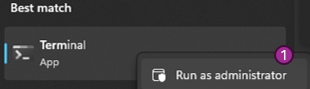
Depending on your setup you can run Powershell commands in Windows Command Prompt (CMD), Terminal or the PowerShell shell. Normally you will need to run the application as an Administrator, in Windows Right click on the application before opening it and select "Run as administrator"
- Run the following two (A & B) commands:
A) Run the teams import command:
Import-Module MicrosoftTeams
Sometime PowerShell takes its time ☕ to run and may not look like its doing anything. If you think it maybe stuck, try pressing "Return/Enter" on the keyboard if nothing happens, its still going.
When running the above step depending on what you have used powershell for in the past you may get one of or all of the following error messages.
- Module not loaded
- Running scripts is disabled
- Other errors
If you get an error saying: Import-Module : The specified module 'MicrosoftTeams' was not loaded because no valid module file was found in any module directory.
- Run the following line of powershell:
Install-Module -Name MicrosoftTeams -Force
This should install the missing module.
-
Once complete, close the terminal window then open a new window in the same way (making sure you are still running as an administrator).
-
Run the the same import command that gave you the error:
Import-Module MicrosoftTeams
If this now works, continue with the process below, if you get a new error, see if its covered by another tab above.
If you get an error saying something like: Import-Module : File C:\Program Files\WindowsPowerShell\Modules\MicrosoftTeams\x.x.x\MicrosoftTeams.psml cannot be loaded because running scripts is disabled on this system.
- Run the following line of Powershell:
Get-ExecutionPolicy -List
You should see a list close to the below:
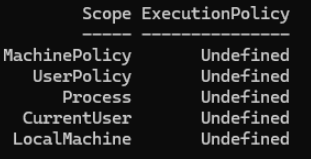
- If the CurrentUser is set to anything other than RemoteSigned run the below. If you do see RemoteSigned under the CurrentUser section then please contact support.
Set-ExecutionPolicy -ExecutionPolicy RemoteSigned -Scope CurrentUser
Once completed run the policy check again:
Get-ExecutionPolicy -List
You should now see the CurrentUser section set with RemoteSigned

- Run the the same import command that gave you the error:
Import-Module MicrosoftTeams
If this now works, continue with the process below, if you get a new error, see if its covered by another tab above.
If your are getting a different error or just not sure what to do next, please contact our friendly support team with a screenshot of the error and the step you are stuck on.
B) Once completed with no errors run the teams connection command:
Connect-MicrosoftTeams
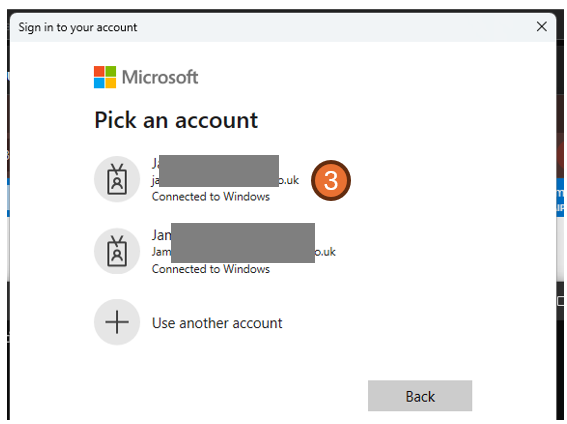
- You may (or may not) get a popup asking you to login, make sure you login with your Azure admin account from the above App registration steps and accept the permission options.
- If everything worked and the script has completed you should an output with your Azure Tenant information
- Update the below PowerShell to add “YOUR APP ID” instead of the placeholder below.
The APP ID you need to replace in the bellow is the same as the Application (client) ID you stored from Step 5 during the App registration steps
New-CsApplicationAccessPolicy -Identity AiphoriaTranscriptSub-policy -AppIds "YOUR APP ID" -Description "A Policy that enables Aiphoria TeamScribe Bot to access Teams transcripts"
- You should see a response like the below:

- Once the above is shown, just one more step to go. Run the last line of PowerShell:
Grant-CsApplicationAccessPolicy -PolicyName AiphoriaTranscriptSub-policy -Global
- Close the PowerShell window 💚.
Next steps
And thats the hard part done 🚀. Next its just sending an email 📧 and a quick test 🧪. I told you it was easy!
Send the below to Aiphoria
Aiphoria now need to complete a small setup on there side. You need to send them the following information via a secure method:
- From step 5 during the App registration steps: Application (client) ID .
- From step 5 during the App registration steps: Directory (tenant) ID.
- From step 4 during the Certificate creation steps: The “value” from the secret created .
- Delivery method: select one of the below and supply the additional information requested:
- Email - find out more
- Email address for delivery
- Text within the email body or Word document as attachment
- Slack message - find out more
- Client ID
- Client Secret
- Teams - find out more
- Documentation coming soon
- CRM integration (e.g. salesforce)
- Documentation coming soon
- Dropbox
- Documentation coming soon
- Email - find out more
Test the integration
Once Aiphoria has confirmed setup is complete with the information sent over in the above section you will need to run a quick test to make sure Aiphoria can get the transcript and you are able to get the output 🤖.
- To run a test, simply add a new meeting into outlook with a teams meeting invite attached.
- Start the meeting (no one else needs to join to run the test but the more the merrier 🤗).
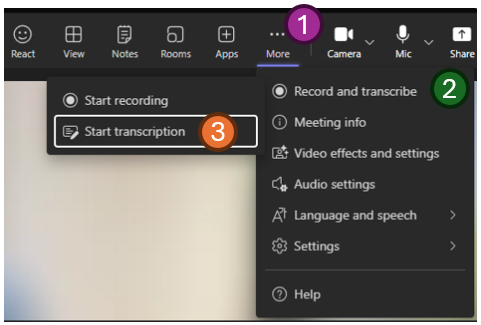
- Once started, in Teams click on
- More
- Record and transcribe
- Start transcription (Note: if you also wish to have a copy of the audio you can select "Start recording" as well but this is not needed.)
- The transcription should now start to show within teams. Make sure you say a few words, something profound no doubt.
- End the meeting
- A few minutes later you should see the results of the analysis via your selected method.
Congratulations
🎉 Congratulations, that really is it this time! You are setup and good to go 🎉