Account screen
The account section is self service account configuration page for the Focus portal. It lets Super Users update or manage account level settings like forced comments, transcription or API access.

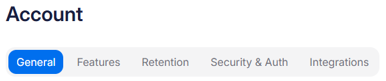
The Account page (2) is accessible via the Admin menu (1) in the left hand bar and is comprised of a number of sub sections. This page is designed to help you setup Focus how you want to use and your organization want to use it. Each sub section is detailed below and can be accessed via the tab bar at the top of the page.
Each section is covered below in detail and as we expand the self service options, this document will be kept up to date so you can make Focus, yours.
This page of the Focus portal can only be accessed by Super users.
Table of contents
Within this section you can find the following:
- General - Covering your account details
- Features - Covering AI options, forced comments, reviews and network integration options
- Retention - Account level legal hold option
- Security & Auth - IP restriction and 2FA
- Integrations - Integrations with other systems including API, SFTP, CRMS and Email
General
The general section allows you to see your base account information.
Account Details
This section can be very helpful for troubleshooting or when talking to the Focus support team. It also allows you to confirm some details about your account and billing information.

- Account Name - This is the name of your account. A friendly name that will allows the Focus support team to confirm they are assisting with the correct account. Also, if you have access to more than one account, it allows you to make sure changes are being made in the correct account.
- Account Type - Sometimes called a SKU, this is the type of your account. This has a direct effect on the options you have available within the Focus portal and your billing.
- Account GUID - A globally unique short account code. This is a slightly less friendly way to confirm what account you are currently looking at; however is very helpful for any support requests or API access.
- Telephony GUID - A globally unique code that links any telephony recording with your account. This code is used to tag all communications for your instance and is linked directly to your accounts encryption process, to ensure all communications are protected and only available within this Focus portal and database.
- Save changes - This save button is not relevant on this screen as the data is read-only, however if you have made changes on other tabs, it will become enabled, allowing you save all your progress.
Features
The features tab covers a few sections, what you see in this tab will depend on what is enabled on your account and with your current account type or SKU. All options are listed here so if you see something you would like to use but can't currently, please reach out to your account manager or support team.
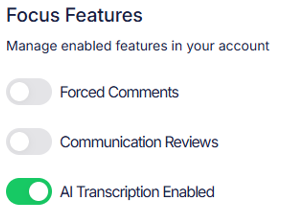
Focus Features
This first section is all about Focus specific options and features. Mostly around how users will interact with the portal and communication.
💬 Forced comments
If enabled in the admin section, forced comments will require a user to enter a reason for listening to the call before they are able to begin playback.

When selecting a call from the communications screen the plaback bar will be blocked and a comment must be added via the Add Comment button.
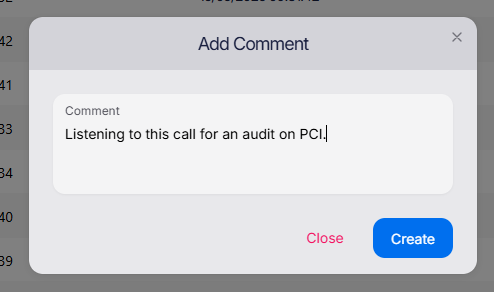
Adding a forced comment is the same as normal comments but a timestamp and tag are not able to be added as this comment must be added before playback.

Once the comment has been Created playback will begin as normal.
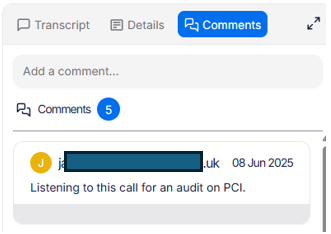
Forced comments will show within the normal comment section with the name and timestamp like a normal comment.
This is a global setting and will cause all users to enter a comments for each recording. If the same call is selected for playback again within 5 minutes a second comment is not required.
📋 Communication reviews
Communication reviews are a way to allow users to review any communication in a structured way. Think of it like a survey about the communication.
Communication reviews setup

When enabled Communication reviews can be simply Enabled or Mandatory.
Communication review examples
Communication reviews are bespoke for each customer within Focus, so if you enable this for the first time please reach out to support to help you setup your reviews. Below is an example of the process once enabled.
Each customer may have as many review templates are needed and reviews can select the relevant template based on the type of call they are playing or maybe the type of user they are.
When enabled (Mandatory or not) a new tab will show in the full screen playback page.
- Select the Review tab
- A list of completed reviews for this communication will be shown
- To add a new review press the Add Review button.
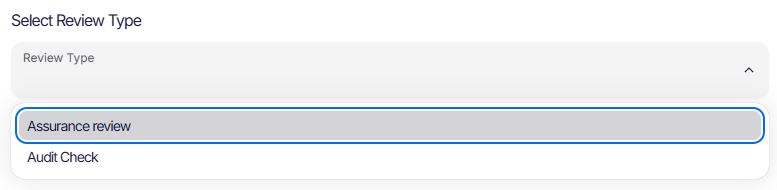
A list of currently active review types will be presented. Selecting one will load the relevant review page and example is shown below:
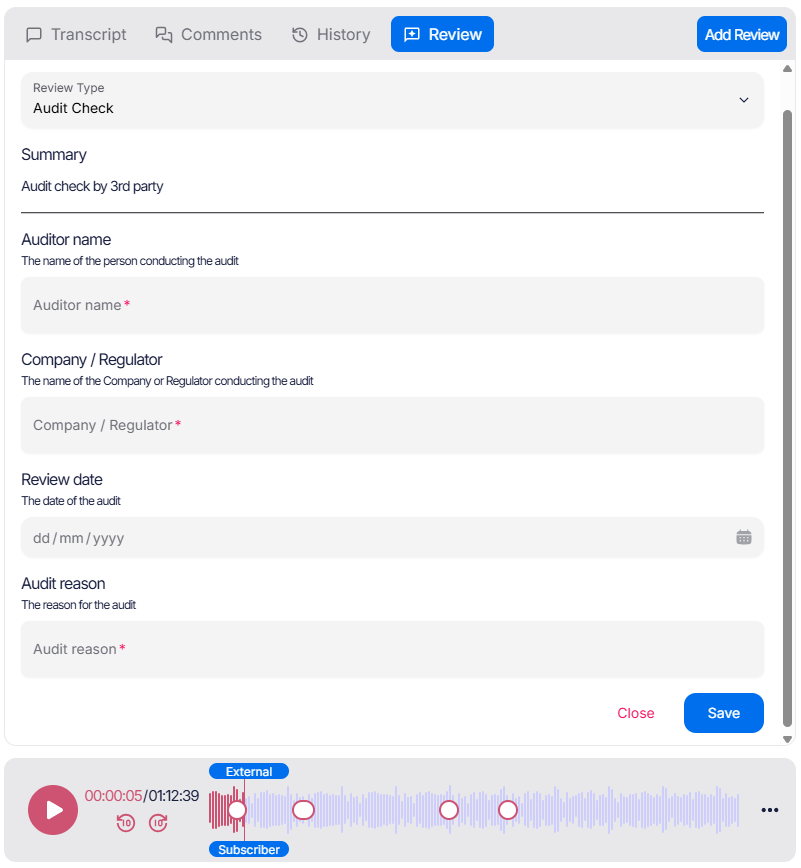
The above audit review example is then completed by the user and would show on the history page. Options for review forms include:
- Short text - 1 line text comments
- Large text - Multi line text comments
- Drop down list - A drop down with a fixed list of options to select between
- Dates and time - A date or date and time selection box
- Toggles - Choice between two options (Yes/No, True/False, Did do something / Didnt do something)
- Sliders - Select a score on a scale
The user is able to listen to call while completing the review, this is normally important as the question tend to link directly to events in the happening durning the communication.
Users with access to the reports screen can then download a report with all the scores provided across all communications.
Forced Comments and Communication Reviews are not allowed to be enabled at the same time, as they would cause confusion. If you enable both, the first one enabled will be switched off.
🤖 AI Transcription
Focus was built with AI at its heart 💖 and therefore AI transcription is included with all Focus licenses at no extra cost 🥇.
Don't get us wrong, everything works without it, but when enabled the platform comes to life with insights, analysis, follow along transcription and free text searching to name but a few. More information can be found within the Communication section of this help guide, but if your policy allows, we recommend you enable this option from day one.
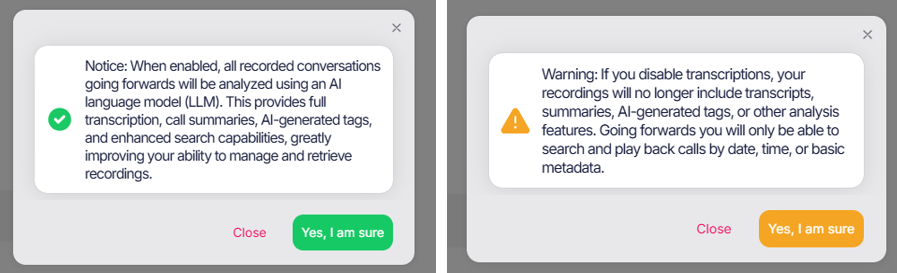
When toggled (on or off) you will be prompted to confirm the changes that will be applied to your portal and your done. If enabled you now have access to:
- Follow along transcriptions
- Automatic communication categorizations (outcomes)
- Segment detection - Skip over the "hello how was your day" part and get to the good bit
- Translations - Show both the spoken language and another language.
- Speaker detection
- Full free text searching over all communications - find names of competitors or specific product names
- Smart journey linking (coming soon)
- Sentiment (coming soon)
- Custom tags (coming soon)
- Lots more...
Network recording features
If inline network recording is enabled on your account (Mobile Phones or Fixed lines) options within this section will allow you to manage:
Announcements
Announcements let you automatically tell the people phoning or being called, by your recorded users, that the audio is being recorded. When your account is provisioned you can select one of the below options, but this can also be changed at any point via the portal.

Options are:
- None - If you wish to disable the announcements and tell users via another method, select this option.
- Beep - A single deep is played when the call starts to signify recording has started.
- This call is recorded - A voice telling the users that "This call is recorded".
- Recording - A voice telling the users that this call is "Recording".
- Recorded and Monitored - A voice telling the users that "This call is recorded and monitored".
- Custom - Custom audio files are supported for playback. If you wish to supply your own recording please log a support ticket.
The default options currently only support English but have both a Male and Female variant, other language versions can be created or supplied via the custom option.
Dynamic private calls
Focus supports lots of ways of setting any communication made to be shown as private, via endpoints settings, group settings or dynamically.
Dynamic private calls are enabled by default and allow a user to press *1 (star, followed by the number, one) on their phone keypad. This can be pressed at any point within the call and both participants will hear three beeps played onto the call to confirm. This recording will be marked as private within the Focus portal and only playable by the user that made the call and super users.
See playlists for how private calls can still be shared if required.
Teams recording features
If enabled on your account, Microsoft Teams specific recording options will be displayed within this section.
Zoom recording features
If enabled on your account, Zoom specific recording options will be displayed within this section.
Broadworks recording features
If enabled on your account, Broadworks specific recording options will be displayed within this section.
Retention
The bulk of the options around retention can be found under the Retention screen options and Legal hold screens in the admin section.
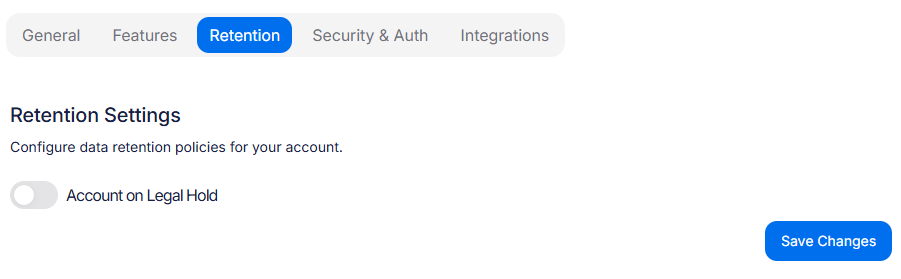
Within this tab you can enable a full system wide legal hold. Enabling this means that no communications (no matter what retention group they are in) will be removed from the platform. When disabled any communications that have now expired will be removed from the platform.
If disabled expired communications will instantly, no longer be playable within the portal. They will be deleted overnight. It is recommended that you run the retention report prior to disabling this flag, to check what data would be removed.
Security & Auth
IP Restrictions
If you wish to restrict users (both SSO and local) from being able to login to Focus, unless they are accessing the platform from a specific IP address, you can set this whitelist on the Security and Auth section of the accounts page.
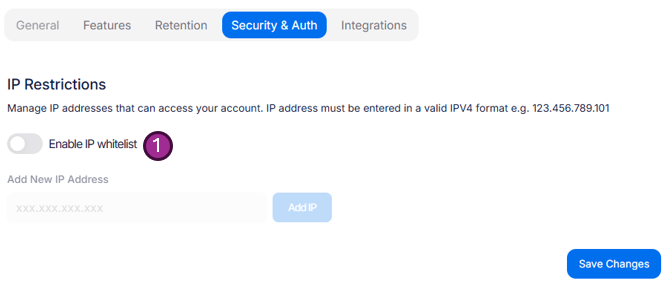
To enable the whitelist and start adding allowed IP address simply toggle the Enable IP whitelist (1) option.
Once enabled you will be able to add as many IPs as require access.
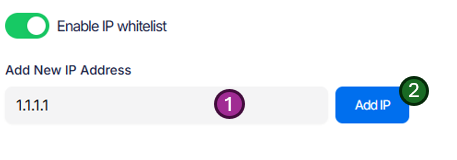
Make sure you have checked that your current IP (or if you use a VPN, the VPN IP) is included in the range you have added, if not you will no longer be able to access the account. You can check your current IP address via a simple search or try this website: https://www.showmyip.com/
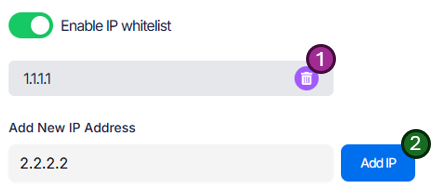
Once you have added an IP address, you can add more via the same method (2) or remove an already active IP address via the bin icon (1).

Continue adding IPs until you have added all addresses your users may use (1) (or your VPN address), press Save Changes (2)
Before you press Save Changes (2), double check your current IP address is on the allowed list.
Two Factor Authentication (2FA)
Two factor authentication is mandatory for all local Focus users.
Security is very important and as such the ability to disable 2FA has been removed from this section of the portal. 2FA is now mandatory for any local access to the Focus platform.
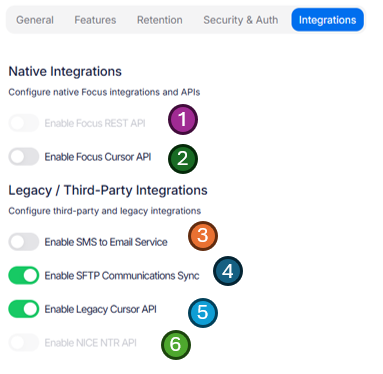
Integrations
Your data is and always will be your data, and even though the Focus user interface is designed to be simple to use and very powerful, we understand that you may need to send or link data into other systems.
- Native Focus REST API
- Native Cursor Synchronization API
- SMS to Email
- SFTP Access
- Legacy Cursor API
- NICE NTR/NTX API
If any of the below options are missing or grayed out or unavailable, they may not yet be enabled on your account. Please contact support and we will be happy to help.
Native Focus REST API
The Native Focus API lets you interact with your data stored in Focus with a full REST API. This includes options like:
- Search for communications
- List current endpoints
- Update users names or metadata
- Disable users when they leave
- And much more...
Once enabled on your account A full integration guide can be found under the integrations section of the help page.
Native Cursor Synchronization API
The Focus platform offers a robust Cursor API designed to streamline data synchronization between Focus and third-party systems. Using a Cursor API provides several key benefits:
- Efficient Data Synchronization: Incrementally transfer only new or updated records since your last request, reducing bandwidth and improving performance with large datasets.
- Reliability: By tracking the position of your last successful sync, the Cursor API helps prevent data loss or duplication, ensuring integrations remain consistent and reliable.
- Scalability: Easily handle increasing volumes of information as your data grows, without overloading your systems.
- Simplicity: Abstracts away complex synchronization logic, making it easier for developers to integrate Focus with other platforms quickly and with minimal code.
- Real-Time Updates: For applications that require up-to-date information, the Cursor API allows for near real-time data syncing, keeping your systems in sync with Focus at all times.
- Flexibility: In addition to simple synchronization, the full API allows for advanced interactions, such as downloading or updating specific data within Focus, supporting a wide range of integration scenarios.
Native Cursor Setup

To enable the Native Cursor API on your account simple toggle the switch from within the Focus portal. Currently the API key must be obtained via a support ticket, this will become self service via the portal as soon as possible.
Once completed you can find a full integration guide can be found under the integrations section of the help page.
SMS to Email
SMS to Email can provide a copy of each SMS via email. Each email is sent to a specific address and is base64 encoded. This can be used to provide an archive copy of SMS messages to a 3rd party system.
SMS to Email Setup
SMS to Email can be enabled via the Focus portal.
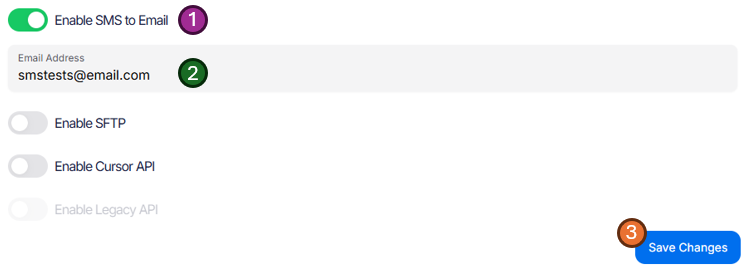
- Turn on the toggle for SMS to Email
- Add the email you would like the Email sent to
- Press Save Changes
Once completed you will start receiving each SMS as an email. A full integration guide with examples, headers and screenshots can be found under the integrations section of this help page.
SFTP Communications Sync
SFTP Setup
SFTP sync provides access to your communications and metadata via an SFTP client. If enabled on your account, SFTP access can be turned on via the accounts screen.
SFTP is considered a legacy integration, it is recommend that the Focus API is used to access recordings instead of SFTP as you will be able to get full metadata and extra data like transcripts, comments and tags. SFTP download only provides access in the described format.
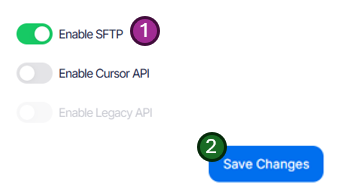
- Select the Enable SFTP toggle.
- Press Save Changes
A new SFTP Username and Password will be generated and shown in a popup. Copy this information using the copy buttons.
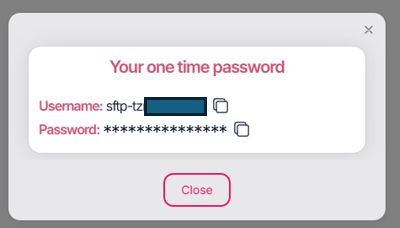
Make sure you save this password somewhere safe and secure, the password will only be diplayed once. If the SFTP is disable and then re-enabled, the password will be reset and be shown again.
Once completed you are ready to start using the SFTP service. A full SFTP integration guide can be found under the integrations section of this help page.
NICE NRT/NTX API
NICE NTR Setup
The NICE NTR/NTX API provides a specific Focus endpoint for use by the NICE NTR GET API. This is only applicable to customers using NICE NTR and must be configured by NICE or your NICE support team.

- Select the Enable NICE NTR API toggle.
- Press Save Changes
Currently the API Username and Password must be obtained via a support ticket, this will become self service via the portal as soon as possible.
Once enabled and you have your authentication information, you are ready to start using the NICE GET API. A full NICE NTR integration guide can be found under the integrations section of this help page.
Legacy Cursor API
Our Legacy Cursor API can still be used by customers who have already integrated to this, however it is missing some of the advanced options available when using the full native Focus API or the updated Cursor Synchronization API. If you would like to look to migration or upgrade and would like further information or to clarify anything regarding this API, please contact support.
Other
Focus has a full workflow system build into it! Want to send your data to a 3rd party CRM, get an email every time a member of staff starts talking about a competitor or simply push a summery or each communication into Slack?
Simple...Below is just a quick example of the current integration used within the platform:
- Simple export:
- Google Sheets
- Excel files
- Chat applications:
- Slack
- Teams chat
- Help desks or tickets systems:
- Jira
- Linear
- CRMs
- ClickUp
- HubSpot
- MIcrosoft Dynamics
- Salesforce
- Zendesk
- Freshdesk
- File stores
- S3 Bucket
- Azure Blob
- Custom
- Custom HTTP POST/GET
- More...
Get in touch with your use case and we would be happy to help.